Secrets to a Rich, Moist Small Chocolate Cake & Luscious Ganache
Are you a devoted chocolate lover who often finds yourself craving that perfect slice of cake, but without the commitment of a colossal baking project? You're not alone! Many of us yearn for a sweet, satisfying indulgence that hits all the right notes without demanding hours in the kitchen or leaving us with an entire cake that's just a little *too* much. The answer, my friend, lies in the magic of a small chocolate cake.
This isn't just about scaling down a recipe; it's about crafting a perfectly balanced, intensely flavorful experience designed for individual enjoyment or intimate sharing. Imagine sinking your teeth into a tender, moist crumb, enveloped by a velvety, rich chocolate ganache – a symphony of textures and flavors that feels incredibly luxurious. This article will reveal the secrets to achieving just that: a consistently rich, moist small chocolate cake, crowned with a truly luscious ganache, making every bite an unforgettable delight.
The Allure of the Small Chocolate Cake
Why has the mini chocolate gateau captivated so many dessert enthusiasts? Beyond its undeniable charm, a smaller cake offers a multitude of practical and delightful advantages:
- Intense Flavor in Every Bite: With a perfectly balanced cake-to-frosting ratio, each forkful delivers a concentrated burst of deep chocolate flavor. There's nowhere for mediocre flavor to hide!
- Perfect Portion Control: Say goodbye to the temptation of overindulging with a giant cake. A small chocolate cake is just right for a personal treat or a modest dessert for two, making it ideal for managing cravings responsibly.
- A Playground for Flavor Experiments: The smaller canvas invites creativity. From classic dark chocolate to adventurous twists like espresso, peppermint, raspberry, or even a hint of chili, these mini cakes are perfect for trying new flavor combinations without committing to a full-sized creation.
- Ideal for Any Occasion: Whether it's a cozy evening with a cup of coffee or tea, a charming dessert for a date night, a special small celebration, or an intimate anniversary dinner, a small cake fits perfectly.
- Thoughtful Gifting: A homemade small chocolate cake, beautifully presented, makes an incredibly thoughtful and personal gift. It speaks volumes without requiring an excessive amount of effort.
- Less Waste, More Freshness: Smaller batches mean less leftover cake going stale, and more opportunities to bake and enjoy freshly made treats.
Crafting Your Perfect Small Chocolate Cake: A Step-by-Step Guide
The journey to a rich, moist small chocolate cake begins with careful preparation and understanding the role of each ingredient. We'll focus on a classic 6-inch round cake, perfect for several servings.
Essential Ingredients & Preparations
Before you even think about mixing, setting the stage is crucial for success. Start by preheating your oven to a precise 350°F (177°C). This ensures an even bake from the moment your cake enters the oven.
Next, prepare your 6-inch round cake pan. This step is non-negotiable for a pristine cake release. Grease the pan thoroughly with butter or a baking spray, then line the bottom with a circle of parchment paper. A common pitfall is skipping the parchment, which can lead to a sticky situation. The parchment acts as a non-stick shield, ensuring your beautifully baked cake slides out effortlessly.
For the Cake Batter:
- Dry Ingredients: In a large bowl, whisk together your all-purpose flour, high-quality unsweetened cocoa powder (Dutch-processed often yields a darker, less acidic flavor), a touch of espresso powder (this secret ingredient deepens the chocolate flavor without adding a coffee taste), baking soda, and a pinch of salt. Whisking ensures these dry ingredients are evenly distributed, preventing pockets of leavener.
- Wet Ingredients: In a separate bowl, combine vegetable oil (which contributes to moisture more effectively than butter in many chocolate cake recipes), a large egg, granulated sugar, buttermilk, and pure vanilla extract. Buttermilk is a true secret to a moist, tender crumb; its acidity reacts with the baking soda to create lift, while its thick texture adds richness. Pro Tip: If you don't have buttermilk, you can easily make your own by adding 1 tablespoon of white vinegar or lemon juice to a liquid measuring cup, then filling the rest with milk up to the 1-cup mark. Let it sit for 5 minutes until it curdles slightly.
Mixing for Perfection
The key to a tender cake is proper mixing. Once your wet and dry ingredients are prepped, pour the wet mixture into the dry ingredients. Beat them together until just combined and smooth. Avoid overmixing! Overworking the batter develops the gluten in the flour, leading to a tough, dense cake. A few small lumps are perfectly fine and often indicate a properly mixed batter.
Gently spread your luscious batter evenly into the prepared 6-inch pan. Its consistency should be thick enough to hold its shape.
Baking to Moist Tenderness
Pop your cake into the preheated oven and bake for approximately 27 to 30 minutes. The exact time can vary slightly depending on your oven, so keep a close eye on it. You'll know your mini chocolate cake is done when a wooden skewer or toothpick inserted into the center comes out clean or with just a few moist crumbs clinging to it. Here's a little "secret": don't panic if the center of your chocolate cake sinks ever so slightly; this is often a tell-tale sign of a wonderfully moist crumb! Overbaking is the enemy of moisture, so trust your instincts and the toothpick test.
Once baked, resist the urge to immediately flip it out. Let the cake cool in the pan on a wire rack for about 10-15 minutes. This allows the cake to set and prevents it from crumbling. After this initial cooling, carefully invert the cake onto the wire rack to cool completely. Patience is paramount here; frosting a warm cake is a recipe for disaster, as your ganache will simply melt away.
Whipping Up the Luscious Chocolate Ganache
While your small chocolate cake is cooling, it's the perfect time to prepare the star accompaniment: a rich, velvety ganache. This simple yet elegant frosting elevates any chocolate cake from good to extraordinary.
The Art of Melting Chocolate & Cream
For the Ganache:
- Chocolate Choice: The quality of your chocolate directly impacts your ganache. Opt for good quality chocolate, whether it's semi-sweet or dark, in bar form (chopped finely) or good quality chips. Finer chopping ensures a quicker and more even melt. Place your chopped chocolate in a medium, heat-safe bowl.
- Heating the Cream: In a small saucepan, gently heat heavy cream over medium heat. Watch it carefully! You want it to reach a gentle simmer, with tiny bubbles just beginning to form around the edges. Do not let it come to a rolling boil, as this can scorch the cream and lead to a less smooth ganache.
Once your cream is hot, immediately pour it over the chopped chocolate in the bowl. This is where the magic begins. Let the mixture rest undisturbed for about 3 to 5 minutes. This allows the hot cream to melt the chocolate evenly.
Achieving the Perfect Ganache Consistency
After resting, grab a small spatula or metal spoon and begin to stir the mixture slowly from the center outwards. Stir gently and consistently until all the chocolate has melted and the mixture is smooth, glossy, and beautifully emulsified. At first, your ganache might appear a bit thin or runny, but don't fret – this is entirely normal. Its consistency will transform as it cools.
Now comes the waiting game. Let the ganache cool and thicken at room temperature for 30 to 60 minutes. As it cools, the cocoa butter in the chocolate will solidify, giving the ganache its luxurious, pourable consistency. If you're pressed for time, you can carefully place it in the refrigerator to speed up the thickening process, but be sure to stir it every 10-15 minutes to maintain its smoothness and prevent it from becoming too stiff or setting unevenly. The goal is a ganache that's thick enough to coat your cake beautifully but still fluid enough to spread or pour.
Expert Tip: For an extra layer of flavor, consider stirring in a teaspoon of vanilla extract, a pinch of sea salt, or even a splash of your favorite liqueur (like Kahlúa or Grand Marnier) into the ganache once it's melted and smooth.
Assembling Your Masterpiece & Enjoyment
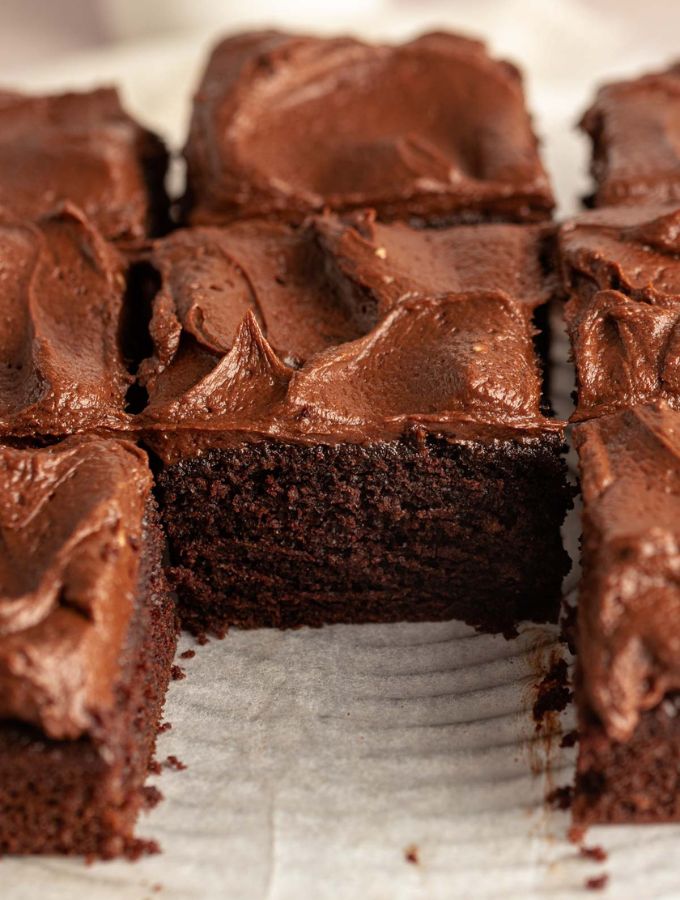
Once your small chocolate cake is completely cool and your luscious ganache has reached the perfect consistency, it's time for the grand finale. Place your cooled cake on a wire rack set over a baking sheet (to catch any drips). Pour or spread the ganache over the top of the cake, allowing it to naturally cascade down the sides. For a truly professional finish, use an offset spatula to gently smooth the top and sides, or simply embrace a rustic, natural drip effect. You can add simple garnishes like chocolate shavings, fresh raspberries, or a dusting of cocoa powder for an elegant touch.
The beauty of a small chocolate cake is its immediate gratification. Serve it slightly chilled or at room temperature. Each rich, moist bite, enrobed in that velvety ganache, is a testament to the fact that sometimes, the most exquisite pleasures come in the most compact packages. Store any leftovers in an airtight container at room temperature for up to 2-3 days, or in the refrigerator for up to a week.
There you have it – the secrets to creating a rich, moist small chocolate cake with a truly luscious ganache. It's an approachable yet incredibly rewarding baking project that proves you don't need a huge occasion to enjoy a slice of pure chocolate bliss. So, go ahead, treat yourself, or surprise someone special with this delightful, intensely satisfying mini masterpiece!
